Papier Mâché Sun Moon Eclipse Sculptures
- Emily Gould
- Jul 22, 2022
- 6 min read
Updated: Jun 22, 2023
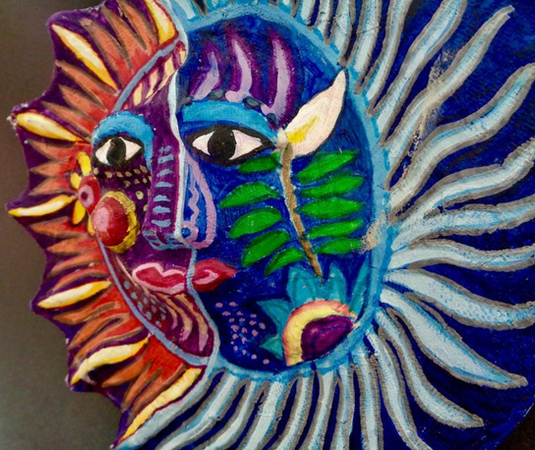
Inspired by Mexican sun, moon, and eclipse decorative art.

The Sun and Moon represent the two extremes of human nature, necessary to achieve balance and stability. The sun rises every day, heats and lights the earth as the moon illuminates the night sky, and its gravity affects the tides.
Students constructed their suns/moons and/or eclipses by combining paper bowls with trimmed cake circles. Sculptures were covered in paper mache. Paint, glitter and sequins were used for embellishment.

Student Sun, Moon, or Eclipse sculptures. Ages 5-15. I taught this art lesson at a summer camp one year, 90+ students! This art lesson is very popular with all ages and is a great introduction to the papier mâché medium.
This video documents the process of creating Sun, Moon, or Eclipse Sculptures.

This art lesson was inspired by Mexican sun and moon decorative art. I lived and taught art in Mexico for three years. This photo shows popular Mexican ceramics. Sun and moon decorative art is found all over Mexico.
Why is the sun and moon a popular theme in Mexican Art?


Pyramid of the Sun and Pyramid of the Moon in Teotihucan, Mexico State, Mexico.
In Teotihuacan near Mexico city, the Aztecs dwelled in an abandoned city with enormous pyramids known as the Pyramid of the Sun and the Pyramid of the Moon. The Moon is the counterpart that balances the sun. The moon represents cooling, calming, instinct, reflection, mystery, emotion, and the dream world. The Mexican sun, Sol (in Spanish) has a very rich historical background and plays an important role in the life of the “Huichol” tribe of Mexico, The sun is associated with Spring rituals, when life is reborn and flourishes. The Spring is also the time of year to prepare land for harvest. In the “Huichol” pueblos, a ritual is prepared for the “deer”, which is the sun that carries light to the pueblos throughout this three-day celebration!
A trip to Mexico City isn't complete without exploring the picturesque Teotihuacan Pyramids.

Map of Teotihuacan, Sun and Moon Pyramids, Mexico.

Sun, Moon, OR Eclipse Sculptures


student art ages 5-15
Supply List (and notes)
Cardboard Cake Circles. I am using the 12" size. You can find them on Amazon but if you are looking for a more economical price I recommend finding a restaurant supply store near you. At a restaurant supply store near me I can find, 12" Corrugated White Cake Circles - 250/Case for $40. *You must use something strong for the base of this sculpture project!
Chinet Classic White Fiber Bowls. I recommend the Chinet brand because they are stronger than plastic or foam disposable bowls. Yes, I have used other brands but the durability of Chinet works best for this sculpture project! You can find Chinet Classic White Fiber Bowls in bulk at warehouse clubs. Currently at BJ's they sell for $13. for 150 bowls.
Masking Tape. I usually buy masking tape in bulk from a warehouse club. I'm using General Purpose Masking Tape, 18mm x 54.8m, 3" Core
Newspaper
Utility Knife
Scissors
Papier Mâché. I use flour and water. Approximately one part flour and two parts water.
Pencils.
Paint. I use a combination of economical acrylics and tempera paint. Whatever I have in the art room. *I prefer the white paint to be acrylic.
Jewels, Sequins, Glitter Paint. *OPTIONAL but recommended for embellishment.
*This art project takes about 4, (45 minute) art classes to complete.
Art supplies...cardboard 12" cake circles, Chinet Classic fiber bowls, masking tape...


Making Papier Mâché Sun, Moon, or Eclipses,
The Process...

There are 5 steps to this project!
Step 1. Building the armature
Step 2. Papier Mâché
Step 3. Gesso
Step 4. Painting
Step 5. Embellish
This is my board in front of the classroom... (In this photo my students are on Step 5!)

Step 1. Building the Armature
You will need cake circles, masking tape, pencils, and scissors. I carry a utility knife in case I need to help students cut the cardboard circles quickly. You will also need newspaper or something to build the nose with.

First students tape the bowl to the cardboard circle.


Once the bowl is taped to the cardboard circle. Use a small amount of newspaper to build a nose. The nose is made with about 1/2 a sheet of newspaper, the newspaper is folded again and again to create a rectangle nose shape. Make your nose any shape you desire. It's good to make it a little larger than you think you need it because when you apply papier mache over the nose shape the layers of paper mache may completely cover the nose. You want your nose to be noticed! The nose shape is taped in the center of the bowl.


students building armature with newspaper and masking tape.
The bowl does not have to be placed in the center of the circle!

Ella Grade 4.
Notice Ella's Moon sculpture... The bowl is NOT taped in the center of the cardboard circle. Off- center placement can create an interesting composition! I encourage students to try the bowl in different spots before taping it to the circle. Also notice that Ella kept her cake circle round. Some students may decide they want to work in the round!
Off-Center Design vs. Center Design


Two ceramic eclipse sculptures. One with the faces center and one off-center.
Building more than just the nose
The advanced version of this art lesson.


Teacher example.
In my example I have built more than the nose. I have also built the eyes, cheeks, and a few of the flowers. I encourage older students that want a challenge to build more than the nose! This is why THIS is a great sculptural art lesson for ALL ages...You can keep it simple by only building a nose or make it more of a challenge by building other sections of the sculpture!


Nicole, Grade 11
This high school student attached her bowl to the cardboard circle, off-center! She used newspaper to build the facial features on the sun. She built the nose, eyebrows, chin, cheeks, and sun rays with newspaper. She also used newspaper to build the shape of the moon. There is a lot of armature building in the above two examples!
What if a student pushes too hard on the Chinet bowl while building the armature OR while painting?
Let's take a look at Alan's sculpture. He pushed too hard on the Chinet bowl while taping the nose of his sculpture. This caused a dent in the face! No, he will NOT need to start over! Using a utility knife I cut a hole in the back of the cardboard cake circle and I pushed the front of the sculpture back out!
Cutting a hole in the back of the cardboard, allows you to fix a dented sculpture!


*This does not happen often!
Cutting the cardboard circle.
After the bowl is taped to the 12" cake circle the shape of the suns rays are drawn with a pencil and then cut out with scissors. I stand by with a utility knife and offer help incase anyone is having trouble cutting cardboard with scissors

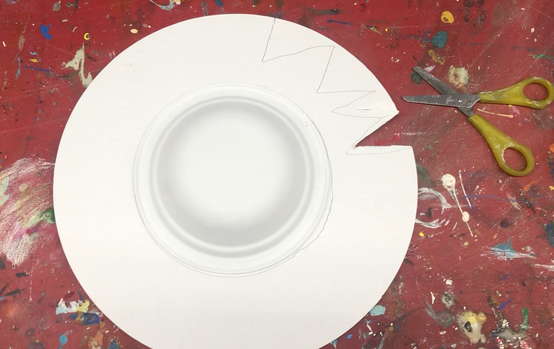

This cardboard was cut to look like sun rays. Scissors were used to cut the cardboard.
Are you creating a sun, moon, or eclipse?
How are you going to cut your circle?
After the bowl is taped to the cardboard circle and the nose is built....
Students use a pencil and draw the sun's rays. Students cut along the pencil lines.
Before we paper mache the cardboard circles are cut out!
* It can be difficult cutting the cardboard circles. I walk around the room with a utility knife and help students cut out the sun rays quickly.

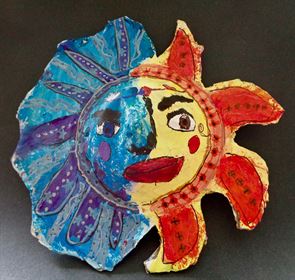


Eclipse Sculptures by Grade 3 students.
Notice that half of the cardboard circle is cut to look like sun rays...the rest of the circle is left round to represent the moon.
STEP 2. Papier Mâché


I use a traditional flour and water mix, it's economical and it works! One part flour and two parts water. It is not necessary to cover the entire sculpture with paper mache. Just cover the nose and all of the masking tape! This art lesson is a great introduction to the paper mache medium because it's not too much to paper mache and you can get the feeling of the medium and how it works.

STEP 3. Gesso


Gesso prepares (or "primes") the surface for painting, Gesso makes the surface slightly textured and ready to accept acrylic or tempera paints. Without applying Gesso, it will take many more layers of paint to get bold bright colors! Gesso hides the print in the newspaper and makes your paint colors brighter without having to apply several layers of paint.
STEP 4. Painting
This is the step students are most excited about. We are using a combination of economical acrylic paints and tempera paints (NOT washable temperas...the formula is like a finger paint and does not work as well as regular tempera paint!)


Elementary students painting
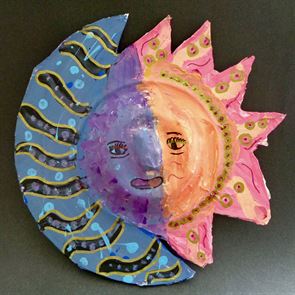
STEP 5. Embellish
Sequins, acrylic gem stones, glitter paint...
This might be the best day of art ever...it's time to embellish! We spend more than one class painting/embellishing, this works out well if a student is absent they can usually finish in one class period instead of two. Taking the time on the painting step will yield better results! After the first layer of paint is dry students are offered glitter paint. Glitter paint usually goes on clear but adds glitter to the surface. Glitter paint works much better over dried paint and is not nearly as messy as glitter. Students love glitter paint! Using white school glue students attach acrylic gemstones and sequins. If all of the paint is dry I may even offer permanent markers or paint pens, whatever I have that draws on top of dry paint. This final layer is great for adding details!
Sequins, acrylic gem stones, and glitter paint!


Student Gallery


Ariella, Grade 7

Ava, Grade 8

Ari, Grade 3

Sajtana, grade 4

Rapha, Grade 9

Radha, Grade 4

Sara, Grade 4

Max, Grade 4

Lauren, Grade 4

ChanaRisya, Grade 2

Sara, Grade 2

Sun, Moon, or Eclipse Sculptures
Student Art.


Comments