ChromaDepth 3D Paintings
- Emily Gould
- Feb 15, 2024
- 9 min read
Students follow the color encoding rules of ChromaDepth® 3D glasses to create paintings that really pop!

Colors are carefully selected for this optical illusion assignment to be successful. Warm colors pop and cool colors recede with ChromaDepth® 3D glasses.

Are you looking for an art project with 100% student engagement?
This 3D art project captures students attention and imaginations!
This art project puts the A in STEM and uses science, technology, engineering, art, and math...A favorite STEAM art project!
This art lesson involves color theory, students must understand the difference between warm and cool colors for the 3D effects to be most successful! Also a great opportunity to discuss tints and shades of color to see how they react to the science and technology of ChromaDepth glasses.
Here's the Science, Technology, Engineering, and Math part...
In order for this art project to be successful you must understand how ChromaDepth 3D glasses work...
How Do ChromaDepth® 3D glasses Work?

A painting or drawing is two-dimensional (2D). All positions on the image can be located by their X and Y coordinates. A three-dimensional (3D) image or sculpture has another dimension, Z. Think of this In terms of your computer screen, X is horizontal position, Y is vertical position, and Z is the position into or out of the screen. ChromaDepth 3D technology uses color to carry the Z position information.
Two Dimensional (2D) vs. Three Dimensional (3D)

In terms of your computer screen...X is the horizontal position, Y is the vertical position, and Z is the position into or out of the screen. ChromaDepth 3D technology uses color to carry the Z

ChromaDepth 3D technology uses color to carry the Z position

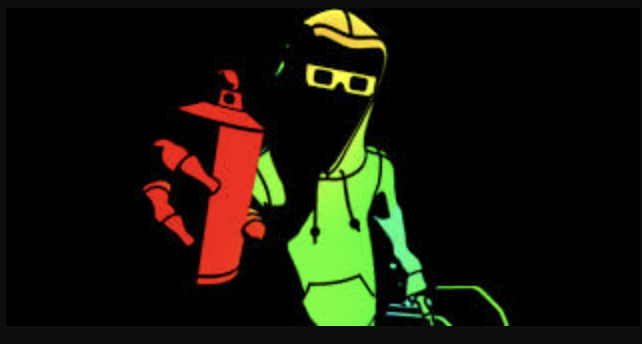
Warm colors float towards your eyes and cool colors recede into the distance.

When you put on a pair of ChromaDepth 3D glasses you will notice a prismatic shift. The warm colors, especially red has the strongest perception change. Reds float or ride closest to your eyes. You will notice the warm colors floating off the surface of your picture, almost in the order of the rainbow but pink, a tint of red will float further towards you than orange. The perception of cool colors changes too. Cool colors sink or recede into the background.
Blues sink the furthest back while Reds float the closest to your eyes.

This diagram examines the prismatic shift that happens with ChromaDepth 3D glasses.
The ChromaDepth 3D process enables 2D paintings to become 3D experiences when viewed with ChromaDepth® 3D glasses!
Rules for Color Encoding

I created this diagram to show students how colors react to your eyes when wearing ChromaDepth glasses. Warm colors pop or float towards your eyes. Red floats the closest to your face followed by pink, orange, and then yellow. Tints move forward (Tint= any color + white). White by itself, not mixed with a color rides in the middle. Black next to a color rides at the same level. Black next to a warm color will float and black next to a cool color sinks. Cool colors sink or recede into the distance, in this order; green, violet, and blue receding the furthest.
In this art assignment your colors will float over or sink into the paper. You choose the colors to create dramatic illusions of depth! You control the 3-D illusion! Carefully choose your colors for maximum effect!
Students will design art to be viewed wearing ChromaDepth® 3D glasses!
Where do you get ChromaDepth® 3D glasses?
You can find these glasses all over the place!
About seven years ago, Crayola sold sidewalk chalk that included "3D glasses". The actual name of these glasses are ChromaDepth® 3D glasses. This is when I first discovered ChromaDepth technology and I started researching how these glasses work. I bought one of these chalk sets for one of my children and I was intrigued to find out more about this technology!


On Amazon you can find ChromaDepth® 3D glasses for $2.45 a pair OR 12 pairs for $10.95


That's not enough -quantity- for my art classes! So I buy ChromaDepth® 3D glasses directly from the distributor... American Paper Optics. They sell a variety of 3D glasses
ChromaDepth 3D glasses do NOT have the traditional red and blue lenses...The technical name for the red and blue glasses is anaglyph. Despite anaglyph glasses' universal association with 3-D, they're rarely used anymore! Using red and blue lenses in 3-D glasses might give the sensation of depth, but they also cause a degradation of color and will not work for this art project!
Make sure you order ChromaDepth® 3D glasses.
American Paper Optics has several ChromaDepth® 3D glasses to select from. I usually order The "Solid Black Standard frames." These frames are made of a lightweight durable cardboard. Cardboard frames are the most economical style! There are three cardboard style frames to choose from, they are all the same price. I always opt for the black frames!
The more pairs you buy the more money you save! This is the biggest expense of this art project but I order in bulk so that I don't need to order too often and all the other supplies I need for this art lesson I already have in the art room! When I hand out the glasses, students write their names on the glasses with a white gel pen or metallic marker. When the artwork goes home students take their glasses home so that they can share this 3D experience with their families and friends!

T
he solid black standard ChromaDepth® 3D glasses are sold in quantities of 50. Minimum order of 50 glasses.

If you are looking to purchase just one pair to try out this art lesson you can find one pair of ChromaDepth® 3D glasses for $2.45 on Amazon.
OR you can find 10 pairs of ChromaDepth® 3D glasses for $10.99 (with free Prime shipping) HERE


3D ChromaDepth Art
Now that you have your glasses enjoy the show!
This slide show is a collection of images I show my students before we start the art project. I want them to see some successful examples of how ChromaDepth technology works!


musanim3D on YouTube creates music videos, animated scores of music, that are meant to be viewed with ChromaDepth glasses! Before we start the art project I show my students a few of these very cool 3D music scores...Check out the library of ChromaDepth music HERE
ChromaDepth 3D Paintings...The Art Lesson

I have taught this art lesson for many years. Usually I use tempera or acrylic paint for bolder colors but you can also use watercolor paints. I suggest several layers of watercolor paint to make your colors brighter. The video was created for an online Zoom art class that I taught. We used the above art supplies because these were supplies that Art Club students had at home.

ChromaDepth 3D art lesson taught on Zoom.
Teaching in person, in the art classroom, I typically use tempera and/or acrylic paints on 12x18 heavy weight paper or 11x14 canvas boards, if the budget permits.
These are the art supplies I use in the classroom....
Mixed Media Paper 12x 18, Heavyweight Tagboard (two sheets per students)
Pencil
Tempera paints (I do not recommend washable tempera paints, they are not the same paint! Washable tempera paint is like finger paint!)
Flourescent paints are also a great addition to this art lesson
Scissors
Glue. White school glue and/or glue sticks
I made a video that shows the process of creating 3D Koi Fish. My students have the option of creating whatever subject they want for this ChromaDepth 3D art project!
In the video you will see the process of using watercolor paints and how the 3D koi fish were created.
In the classroom I show students a few options of ChromaDepth 3D art projects that work very well with the glasses. I also offer a few additional art project ideas.
Let's start with Koi Fish...

Download your copy of How to Draw Koi Fish here...


With younger students I use this collage method where the background is painted separate from the objects. I use this method so that the objects are defined against the background and this helps create a stronger 3D effect.
Dark blue construction paper can be substituted for the background instead of painting a background. I prefer the look of the painted backgrounds because the brushstrokes add a nice movement to the composition. Painted backgrounds look especially good in underwater scenes because it's nice to have movement in the water.
Koi Process Slide Show


Step 1. Sketch koi fish on 12x18 paper
Step 2. Paint (background) canvas board 11x14 or 12x18 heavy weight paper
Step 3. Paint koi fish and lily pads
Step 4. (Next class) On top of the dry paint use Sharpies to outline fish and lily pads. Use markers to add details like scales. Also use markers to add lines to the lily pads
Step 5. Cut out koi fish and lily pads
Step 6. Glue koi fish and lily pads to back ground
Step 7. Use white acrylic paint to add movement to the fish. Paint around fish with a little bit of white paint to make it look like the fish are swimming quickly as if they are playing a game of tag. Use white acrylic paint to add splatter on top of the fish and water. Now it really looks like these fish are swimming quickly the water is splashing and will splash in your face when you put on the glasses!
Step 8. Put on ChromaDepth 3D glasses and watch your artwork become 3D
Step 9. Arrange finished artwork around the classroom like a gallery and students walk around and look at artwork like a gallery walk. Have a class discussion about what artwork has the greatest 3D effects.

Student wears ChromaDepth 3D glasses while painting splashes to test the 3D effects.
ChromaDepth 3D Art Gallery
Elementary Art

Finished ChromaDepth paintings are on display in the classroom. This was part of our latest 3D gallery from February 2024. An exciting opportunity for students to walk around the classroom and show art appreciation.
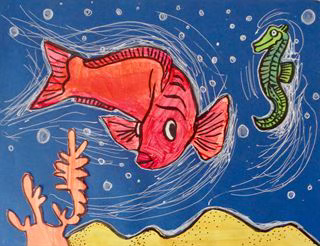
Creating Underwater 3D Paintings, The Process

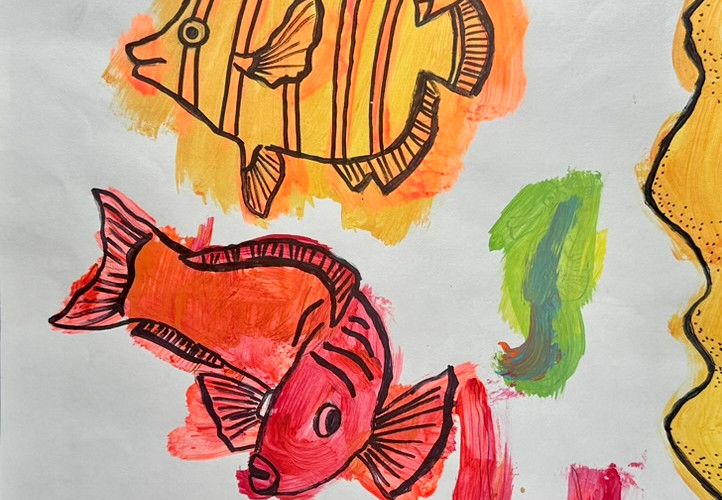


Underwater Themes work very well with ChromaDepth 3D glasses! This slide show shows the process of creating underwater 3D paintings. Since I currently have multiple age levels in the classroom at the same time (Grades 1-6, all at the same time) I offer templates of a variety of fish and sea plants. Templates are optional and help to encourage my youngest students to draw large. The process; Draw fish, paint fish, outline fish with markers, cut out fish, arrange fish onto painted background, glue fish onto background, Use white paint or white gel pens to add bubbles, splashes, and/or water movement. Then put on your ChromaDepth glasses and watch the sea come to life!

Student arranges cut out fish and plants onto painted canvas board.
ChromaDepth 3D Space Paintings, The Process


Space is the perfect theme for the youngest students because this theme uses simple shapes and it's a great opportunity to experiment with sponge painting techniques. This slide show shows the process of creating 3D Space Art...First different sized circles are traced onto a 12x18 paper. Using sponges students can try different techniques. Dabbing the sponge onto a planet will create interesting textures. Sliding the sponge will create nice stripes. We talk about working in color families because the colors that are close together on the color wheel blend well with each other. Neon colors work great for painting planets! Background is painted separately with a dark blue, midnight blue, or black and then splattered with white paint.
After the paint dries (next class) planets are traced with black sharpie. Outlining objects with black lines helps to define the object and black will ride with the color next to it. After outlining cut out planets and arrange them onto the painted background. Look at everything with your glasses on to see how the 3D effect is working, When the arrangement looks good glue the planets onto the background.

Finished 3D Space pictures designed to be viewed with ChromaDepth 3D glasses. This time I also had available space foam stickers and star stickers that students could add into their pictures. ChromaDepth 3D art projects are perfect for summer camp art projects. These students were in one of my summer art camps!
Students painted whatever they wanted BUT they needed to follow the color encoding rules of ChromaDepth® 3D glasses. Colors were carefully selected for this optical illusion assignment to be successful! The ChromaDepth 3D process enables 2D paintings to become 3D experiences when viewed with ChromaDepth® 3D glasses!


Students create 3D paintings that really pop!
ChromaDepth 3D Art Student Gallery
!These paintings were designed to be viewed wearing ChromaDepth® 3D glasses!
Put on your ChromaDepth® 3D glasses and enjoy the show!

"The Chase" by Tzvi, Grade 4

"Kung Fu Panda" by Grade 6

By Ayala, Grade 4

By Vera, Grade 4

By Arik, Grade 8

Zack, Grade 5

Sheena, Grade 5

Xander, Grade 5

Tess, Grade 5

Isimbi, Grade 5

Jayden, Grade 5

Lucas, Grade 5
Lucas recreated Kadinsky's Concentric Circles but changed the colors to work with ChromaDepth 3D glasses.

Koi Fish Pond, Camila, Grade 5

Madeline, Grade 5

Sojo. Grade 5

Lucas, Grade 5

Luke, Grade 5

Teacher Example


Comments