Calder Stabile Mobile Sculptures
- Emily Gould
- Jul 23, 2023
- 6 min read
Updated: Jul 24, 2023

"To most people who look at a mobile, it's no more than a series of flat objects that move. To a few, though, it may be poetry." ---Calder
Alexander Calder (1898-1976) is an American artist best known for adding movement to sculptures. His two most popular forms of sculpture are mobiles and stabiles. His mobiles often hang from the ceiling or a solid support structure, and are moved by air currents or by touch.
Stabiles are sculptures that are stationary- they do NOT move. These were usually made out of sheet metal in the form of simple, abstract shapes. Calder intended for his large stabiles to be seen from all sides. The movement comes from the people viewing the sculpture; they can walk around - or even under! - the stabiles.
Large Scale Stabile Public Sculptures by Calder


In this art lesson, we’ll create a small table top sculpture that has movement like a mobile but stands like a stabile, a standing mobile! This kinetic sculpture project mimics the shapes, spaces and colors of Calder’s famous sculptures. Movement will be added by building off of the sculpture base and creating an additional element that relies on balance. Movement will be activated by an air current like blowing on the sculpture OR touch.
Alexander Calder created many mobiles, stabiles, and standing mobiles.
Calder's kinetic sculptures are truly poetry in motion.

See more of Calder's fantastic Standing Mobile Sculptures at https://calder.org/archive/all/works/standing-mobile/

My students visited The National Gallery of Art in Washington, DC they loved seeing Calder's mobiles and stabiles on display. Calder is famous for his experiments with Kinetic art through the creation of two different types of sculpture: the mobile and the stabile. Calder's sculptures are composed of delicately balanced components that respond to air currents-- his mobiles are graceful and poised. We also noticed that calder used mostly a limited palette of colors on his sculptures. We noticed primary colors (red, yellow, and blue) and black. The moving shadows that these sculptures create brought the sculptures to life and were just as exciting as the sculptures themselves!.
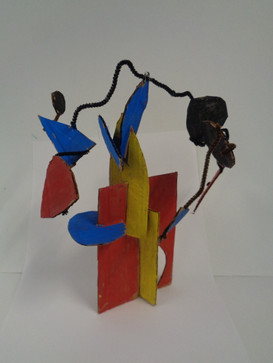
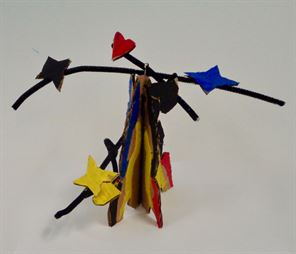
This Calder inspired stabile mobile was created with cardboard, wire, and acrylic paint.
This video examines the movement of the mobile.
Calder inspired sculptures.


We created free standing mobile sculptures.
We visited Calder.org and examined several hundred of Calder's moving sculptures!

Student creates a calder inspired sculpture that matches her wardrobe.

This sculpture art lesson was inspired by the mobile art of Alexander Calder and the theory of kinetic energy, with a focus on the principles of balance and movement.
Calder Inspired Sculptures, Standing Mobiles

Art Supplies
Cardboard
Scissors
Wire
Black pipe cleaners
Acrylic paints, red, yellow, blue, black
*This art lesson takes two 45 minute art classes to complete.
Recommended Book...

Alexander Calder: Meet the Artist
By, Patricia Geis.
Find it on Amazon.
This is a pop up book and the sculptures actually pop up and out of the book which may help students to think in 3D. This is an exciting hands-on introduction to the beloved American sculptor, Alexander Calder. In this book Calder's whimsical world is brought to life by imaginative pop-ups, pull tabs, lift-the-flaps, and cutouts. Students found this book fun and inspiring!

In the book, Alexander Calder: Meet the Artist, the sculptures pop up as you turn the pages!
Building The Sculptures
This art lesson uses limited art supplies and challenges students to create a free form standing sculpture with movement without using any tape or glue!
How did we create our sculptures without tape or glue?
Slits were cut in the cardboard...By cutting slits along the edges of the shapes.
It's important to make sure each slit is thin enough so the shapes can slide in and out of each other and also stay put.
Here's one way to start the sculpture... I suggest starting with simple shapes. This sculpture was started with two rectangular cardboard shapes for the base. Two slits were cut into the rectangles. Slide the slits into the slits to make your sculpture stand.
Now you have a strong standing base to build off of.


Cut cardboard scraps into interesting shapes, geometric and/or organic shapes, your choice. Once you have a few cardboard shapes that you like cut as many slits as you’d like for each shape. Now start building and stacking! You can make your sculpture as wide or tall as you choose, the options are endless.


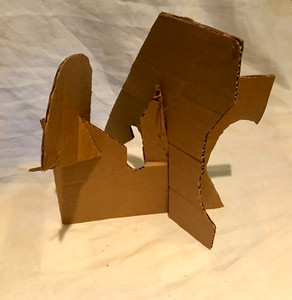
In the above photographs, the first two pieces of card board , the rectangular shapes, were cut into more of a random shape just by removing some of the original rectangle. This creates more interesting negative space around your sculpture. If you decide to cut the first two rectangles you need to make sure that the sculpture base is strong enough to support additional building.
Two students create the base of their sculptures. Cardboard is connected with slits. Glue and tape are NOT necessary to join the cardboard together in this sculpture project!

The sculptures will become more interesting by adding more shapes to the base...Because this is a sculpture it should look interesting on all sides. The sculpture also needs to be sturdy enough to stand! Once you have a sculpture shape that you like from all angles it's time to add a mobile to the top of your sculpture!
Alan (age 10) demonstrates how to build a stabile with a mobile on top
Attaching The Mobile
Using a small piece of wire, shaped like the letter "U"
Insert the U shape upside down into the top center of the sculpture. The U shaped wire should be inserted into the corrugated inner fluting of the cardboard center.
The Anatomy of Cardboard


Here you can see a student inserting a small U shaped wire into the top of her sculpture. The wire should not be pushed in all the way. In this photograph you can also see another student that has the U shaped wire inserted into the top of her sculpture already. Notice the pipe cleaner has been pulled through the U shaped wire. The pipe cleaner is centered, it is equal on both sides. Now the student will be adding small cardboard shapes to each end of the pipe cleaner to create balance, kind of like a seesaw! Mobile movement will be activated by air current or touch.

Now the student adds small cardboard shapes to each end of the pipe cleaner to create balance. It's possible to slide the pipe cleaner inside of the cardboard inner fluting. The pipe cleaner fits perfectly inside of the corrugated inner fluting. Another option is to cut a small hole in the center of the cardboard pieces and insert the pipe cleaner through the hole. Students get creative and discover different ways to attach cardboard pieces to pipe cleaners. Since the pipe cleaners are bendable they can easily be positioned into the desired shape to incorporate balance and design into the mobile.

Once you build your sculpture and add a mobile it's time to add color.
We used acrylic paint to add color to the sculptures. A limited palette of primary colors and black mimicked the look of Calder's sculptures.
Painting The Sculptures


Make this art lesson educational by asking students questions... What shapes do they see? How many sides are on each shape? What colors are you using? You can also use this activity to teach obtuse, right, and acute angles.
This short video documents the movement of the mobile on top of the sculpture.
The mobile is activated by touch or an air current.
These sculptures were photographed with a light source that emphasizes the shadows which adds drama to the sculptures. The shadows also add interest to the space around the sculpture.


Students wrote their names on a sheet of paper and placed their wet sculptures to dry.
This way I could keep track of who created what sculpture.

These sculptures were created by elementary students. I teach at a Montessori school and I have a large group of students ages 6-11 at the same time, in one art class. All students had success with this art lesson. Younger students may need help cutting cardboard depending on cardboard thickness. Older students will be challenged by adding more balance into their mobiles and cutting more interesting and intricate cardboard shapes.


Teacher example.
Student Gallery
These sculptures are 3D and should be documented from multiple angles.
Students were mindful to create sculptures that are interesting from all directions.


Shannon, Grade 4


ChavaMina. Grade 1


Leah, Grade 1


Mira, Grade 4


Dorian, Grade 4


Grade 5


Toby, Grade 4


Zev, Grade 2


EliBer, Grade 5


Mushka, Grade 2
Calder Stabile Mobile Sculptures

If you are looking for a kinetic sculpture project that uses limited supplies, combines art history, and has stunning results...Calder Stabile Mobile Sculptures.
Tag me on Instagram...I look forward to seeing what your students create!


Comments