Collaborative Art Projects
- Emily Gould
- Aug 24, 2019
- 28 min read
Updated: Jun 23, 2023
Students work together to create art for school auctions.
This post is about collaborative sculptures, paintings, murals, and bulletin boards.

Student collaborative art projects

Some of the collaborative art projects for the school auction, 2019-2020
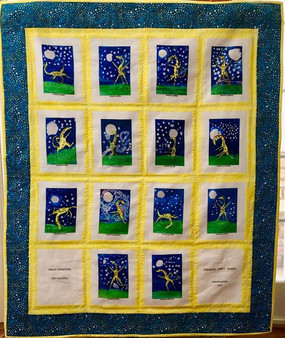
Unity Quilt
A Collaborative schoolwide Mural, Fall 2021
Kindergarten to Grade 5

Thank you Savanna Snow Wilkins for sharing your Unity Quilt collaborative middle school art lesson. I had to try it with my elementary students especially since our school theme this year is "belonging" and this Unity Quilt brings all of us together...
Quilts by Libs Elliott

You can see Libs amazing quilts and read more about her process here, https://www.libselliott.com/

Link to Joshua Davis. He wrote the code that randomly generates compositions for Lib's quilts.
Making A Collaborative Unity Quilt


Kindergarten students design a quilt square that will be part of a LARGE scale paper quilt to hang in our school.

Grade 1 students add their squares to the quilt and watch it grow!

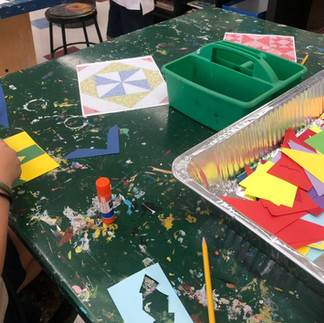
I used this package of precut 6"x6" bright squares because the colors are so stunning and would not fade as quickly as construction paper...Also they are precut! Available at Michaels.
I also used an additional package of precut 6"x6" squares because we have six background colors in our Unity Quilt, one color per grade!

Background color by grade; Kindergarten pink, Grade 1 blue, Grade 2 yellow, Grade 3 green, Grade 4 purple, Grade 5 orange.
Unity Quilt Requirements


For the additional paper shapes that students cut and glued onto their backgrounds I used double sided origami paper. The colors are bright and beautiful and the paper is thinner and easier to cut. 200 sheets, $6.00, available on Amazon


Origami paper was cut into squares, rectangles, and triangles and placed in a few aluminum trays (or baskets). Students selected from the trays, three additional colored shapes of their choice. Students were asked NOT to cut the large background square and ONLY cut the three pieces of paper they selected using straight cuts ONLY to make smaller squares, rectangles, and triangles. When we examined Lib's quilts students noticed that Lib's uses geometric shapes cut with straight lines only. Students did not notice circles or heart shapes in Lib's quilts.

IF a students asked for a fourth color to add to their design I said, yes!
I encouraged students to use ALL the scraps of paper in their designs...using all the scraps was not always possible.
Students took their time to arrange the shapes on the background 6"x6" square. Once the composition was established I passed out the glue and all of the shapes were glued to the background. By waiting to pass out the glue I could make sure that thought went into every design!

Grade 5 Students add their square to the Unity Quilt and watch the quilt grow!

Traditional quilt designs created with paper. Teacher examples
We talked about traditional quilt designs and symmetry. Students could design their squares anyway they wanted! I created a few paper quilt designs to share with students.


student quilt squares that show some hints of traditional quilt patterns.
Many students were fascinated with quilt patterns and recreated elements of traditional quilt designs in their square. If you are looking for a book with quilt patterns to share with you
students this one is great, Traditional Patchwork Quilt Patterns: 27 Easy-to-Make Designs with Plastic Templates (Dover Quilting) Paperback available on Amazon.

The quilt needed to fit on a bulletin board. Rows of 5 fit vertically. The squares were taped together with painters tape on the back and hung in rows.


Thumbtacks held the rows in place temporarily.


One student in Grade 2 really enjoyed this project...he was excited about the idea of a school collaboration. His design included a flap that opened. He wrote a message under the flap.
"I'm so happy, this project will be awesome baby!"


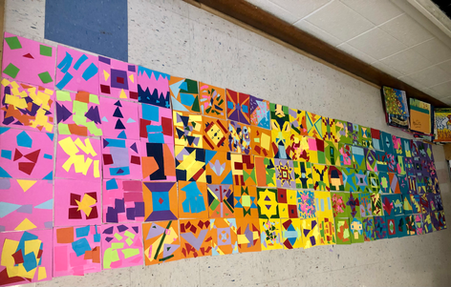


Each square of our Unity Quilt is unique and has exciting Variety .
Unity & Variety, an Element and Principal of Visual Design!
The most exciting part...
Libs Elliott saw our school unity quilt! 🤩 and commented, "Beautiful team work!"


Thank you Libs for inspiring our school collaborative unity quilt!
Kindergarten collaborative Kandinsky
Kindergarten students have been studying color mixing and have worked collaboratively to recreate this very recognizable artwork, "Concentric Circles" by Wassily Kandinsky. Each student has painted one section, 6"x5" with a concentric circle that was assembled into a class mural. There are a total of fourteen squares in this piece measuring 12'"x36" This collaborative work of art was created for the school auction

Learning Goals:
I can...
- Work collaboratively with others to create art for my school community
- Create art in the style of Kadinsky
- mix colors

Supply List
squares on colored card stock paper,
(I used 6x6 colorful card stock squares you can find them HERE
tempera paint
oil pastels
paint brush
Soft Gel Gloss by Golden
When working on a collaborative art project I recommend buying the frame or canvas first! Once you have found the frame or canvas that will work with the project you will know what size to make everything to fit inside. Purchase the frame or canvas first and you can select something in a standard size and most likely you can find a coupon for it too! If you wait to find the perfect frame after you complete the project you will most likely have to custom order the frame or custom build a canvas that fits your project and that will be very expensive!
Each student contributed one concentric square. We used card stock paper because it was thick enough to handle the weight of the paint. I bought it in colors in case the students left sections unfinished. Students started with oil pastels, they colored their circles and about fifteen minutes later we switched to tempera paint to give the project interesting textures and to give little hands a break from coloring.
This year I used a 12"x36" studio quality canvas. I found the canvas first before students painted their squares and then determined what size each students square needed to be to fit the canvas. In order to fit all the squares on the canvas I needed to trim each square to avoid buying or stretching an expensive custom canvas. This 12"x36" canvas was on sale! I used Soft Gel Gloss by Golden to attach the painted squares onto the canvas in a decoupage type application.

This is the process, one square at a time. You apply the Soft Gel Gloss to the back of the painted square and then on top of the painted square.

Using a popsicle stick helps to remove air bubbles and smooth out the surface.
This collaborative Kindergarten Kadinsky from last year was attached to a mat board and then put inside a 18"x24" frame. This class had 12 students and the 6"x6" squares fit perfectly.

Grade 1 Collaborative Black Light Aquarium Sculpture
First grade students worked together to create this collaborative black light aquarium sculpture. Each student painted one fish using neon paint. As students painted I walked around the classroom with a black light so that students could see their fish glowing. I have documented the fish that each student has contributed to the aquarium sculpture. Our black light sculptural aquarium was built inside a shadow box that measures 31"x16"x1.5". The inside of the shadow box was lined with a UV Black Light Strip so that the fish will always glow. This Collaborative art project was created for the school auction.


Learning Goals:
I can...
- Work collaboratively with others to create art for my school community
- Create art that is designed to glow under a black light

Supply List
Shadow box 31"x16"x1.5".
( I found one on sale at Michaels)
card stock to paint fish on
paint brush
styrofoam
spray paint (neon colors for coral)
hot glue
DeepDream Black Light UV Led Strip lights Scotch 3M Heavy-Duty double sided Mounting Tape (the double sided tape that comes with the black light strips is not strong enough!)


some of the supplies used to create the collaborative black light aquarium

Each student painted one fish on a small piece of card stock paper using neon paint. As students painted I walked around the classroom with a black light so that students could see their fish glowing. They were excited to see the effect of the black light on their paintings. The fish really lit up!
Now I had a collection of fish, one from each student to work with.

This is what the fish look like with out the black light and under the black light, big difference!

First the shadow box was taken apart and the inside was lined with the black light strips. The black light strips stayed in place with the heavy duty double sided 3M tape.
The coral for the inside of the tank was glued onto a strip of measured black mat board

Just checking to make sure the coral reef sculpture will fit into the shadow box. Yes, it does!

One at a time the fish were glued into the black background of the aquarium. A few were attached to the coral reef sculpture.


This video documents the process of building this Collaborative Aquarium Sculpture and showcases the final glowing effects.
In a dark room -with the black lights on -the aquarium comes to life...the fish really glow!

The collaborative first grade black light aquarium was sold at the school auction for a few hundred dollars!
Grade 5 Ceramic Turtle Tessellations

Fifth grade students worked together to create these collaborative ceramic turtles.
Tessellation. A pattern of shapes that fit perfectly together!
These Tessellating Turtles are inspired by M. C. Escher (Dutch, 1898-1972) M. C. Escher is famous for exploring space, perspective, and perception. His Impossible Space illustrations and Transformation Prints are very popular. See M. C. Esher art here...


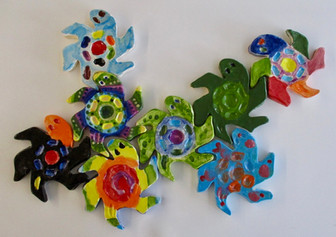


Eight unique ceramic tessellating turtles....These turtles interlock and can be arranged and rearranged in a variety of different ways. Each turtle measures 5 1/2"x5"x 1/4"
Supply List
Clay, I used low fire white clay
Ceramic Glazes, I use Mayco Stroke & Coat Wonderglaze. These are my favorite glazes because you can apply them to wet clay, bone dry clay, OR bisque-ware. These glazes are truly wonderful because you don't need to fire everything twice!
You can find a set of Mayco Stroke & Coat Wonderglazes here
Roylco Animal Tessellation Set, Find the set here
I love these traceable tessellation animals. They are made of durable plastic and are reusable for many years. I used the turtle tessellation in the set as a pattern for these Ceramic Tessellation Turtles!

TESSELLATIONS ANIMAL TEMPLATES by Roylco.
How to make Ceramic Tessellations
This video documents the process
First clay slabs were rolled and it is important to roll all of your slabs equal thickness!
If you don't have a slab rolling machine I highly recommend a set of Slab Thickness Strips
You can find a set HERE

The concept is similar to dowels. The wooden slab thickness stripes are places on each side of the clay and help the clay to stay a certain thickness.

The Roylco turtle tessellation was used as my template.
I carefully use a needle tool to cut out the turtle shape. Water is used to smooth out the edges of the turtles and create the geometric shapes of the shell (see video)


I let the turtles dry interlocked so that they will fit together later.

Glazing ceramic turtles

Here you can see a few turtles that are bisque fired and not glazed. The set is growing!
Each Grade 5 student glazed one ceramic turtle!


These turtles interlock and can be arranged and rearranged in a variety of different ways.
Each turtle measures 5 1/2"x5"x 1/4"
This Collaborative art project was created for the school auction,
Learning Goals: I can...
- Work collaboratively with others to create art for my school community
- Learn about tessellations and create ceramic sculptures that interlock.
Grade 1 Collaborative Laurel Burch Chest
First grade students worked collaboratively in the style of Laurel Burch creating these colorful painted cats in a garden. Cats, flowers, and leaves were decoupaged onto a wooden chest.

Learning Goals:
I can...
- Work collaboratively with others to create art for my school community
- Create art in the style of Laurel Burch

Laurel Burch is famous for painting colorful cats. We were inspired by her famous painting of Cats in the Garden. See her website HERE
Supply List
Wooden chest (I was lucky to find one at the thrift store for $20.)
Colorful card stock papers
Acrylic paint
paint brushes
scissors
Mod Podge
black acrylic paint
Each student painted a colorful cat head with patterns in the style of Laurel Burch. Each student also painted a few flowers and leaves. Cat shapes, flowers, and leaves were pre cut. I painted a few examples to show student.

I needed to keep track of what each student contributed. So I photographed each contribution on black paper.


Now that the cats and the flowers were documented and I knew who contributed which cats and flowers it was time to decoupage.
Decoupage or découpage is the art of decorating an object by gluing colored paper cutouts onto that object. Our object was a wooden chest.
First the chest was painted black. One cat at a time was decoupaged to the chest.


The front, sides, top, and back side of the chest was covered with cats, flowers, and leaves.


The collaborative 1st grade Laurel Burch inspired chest was sold at the school auction for close to $100.

Kindergarten Collaborative Giraffe's Can't Dance Quilt

Created by Owen's grandmother, Bonnie.
Thank you Bonnie for creating this gorgeous one-of-a-kind hand crafted quilt made with love!
This quilt features artwork by Kindergarten students. Bonnie carefully selected fabrics to compliment the artwork. Giraffe's Can't Dance, Kindergarten art was printed on fabric squares. Every student in Kindergarten has their artwork on this quilt!
Artsonia prints student artwork onto fabric!
Read about the quilt block squares product here
About Quilt Block Squares
Our quilt blocks give the "crafty" person a new twist on an old tradition. Create a personalized quilt, pillow or wallhanging that incorporates your child's artwork – a perfect way to preserve cherished memories for a lifetime! Each block of poly-poplin material is cut into either an 8"x10" (small) or 10"x14" (large) rectangle, with at least a 1" seam allowance around the image.
quilt block material measures 8" x 10" (small) or 10"x14" (large)
at least a 1" seam allowance around the image
imprinted image is sized to best fit within 6"x8" (small) or 8"x12" (large) area
perfect for pillows, wallhangings, or old-fashioned quilts
Quilt Block
Your child's artwork is sew magnificent!
Starting at $5.95

Selecting fabric for the quilt.
If you would like to see the original art project that inspired this quilt please visit The Giraffe's Can't Dance Gallery on Artsonia.


These are the pictures I received from Bonnie. She would periodically share her progress on the quilt with me. Thank you again Bonnie for creating this Gorgeous and AMAZING one-of-a-kind hand crafted quilt for our school auction!
Learning Goals: I can...
- Work collaboratively with others to create art for my school community
My Community Mural Project
I taught art in Mexico for three years at an elementary school. This collaborative mural project by first grade students represents the city of Pachuca located in the state of Hidalgo, 1.5 hours north of Mexico City, DF.

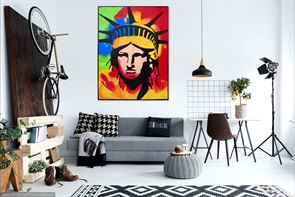
Grade 2 Collaborative Peter Max Mural AKA Liberty Mural
Second grade students worked together to create this collaborative Liberty mural in the style of Peter Max. Each student painted one section (some students painted two sections) I have documented the sections that each student has contributed. The finished mural measures 36"x48". This Collaborative art project was created for the school auction!

Learning Goals:
I can...
- Work collaboratively with others to create art for my school community
- Create art in the style of Peter Max
Peter Max is a contemporary German-American artist known for using bright colors in his work. Works by Max are associated with the visual arts and culture of the 1960s, particularly pop art! A popular theme in his paintings is The Statue of Liberty. See Peter Max Art HERE
Supply List
Canvas 36"x48"
Acrylic paint
paint brushes
Soft Gel Gloss by Golden
Peter Max Mural Plans found HERE
The Peter Max mural plans were found at artprojectsforkids.org
Thank you Kathy for your amazing mural plans ; )
When working on a collaborative art project I recommend buying the frame or canvas first! Once you have found the frame or canvas that will work with the project you will know what size to make everything to fit inside. If you wait to find the perfect frame after you complete the project you will most likely have to custom order the frame or custom build a canvas that fits your project and that will be very expensive!
Once I found the canvas I knew how big I needed to print each section. The mural sections were printed on card stock so that the paper would be strong enough to hold the wetness of the paint. Don't print the mural sections from an ink jet printer the ink is not permanent. I went to a copy store to run off the mural sections.
The Liberty Mural was so popular it was created for the school auction two school years in row!


2018-2019 Liberty Mural and The 2019-2020 Liberty Mural
Both paintings measure 36"x46"


The 2019-2020 Liberty Mural is part of the corporate art collection at M&M Appliances in Washington, DC. You can visit the painting during store hours!
Creating The Liberty Mural

Students followed the colors in the mural plan and painted one section each. Students worked together to paint additional sections. When all the sections were painted they were organized in order.

Paint was distributed in palettes by the number and letter of each section of the painting!
These videos show the process of making this collaborative mural.
Virtually Staging The Liberty Mural
I found this amazing website ohmyprints.com
Direct link to WALLAPP
WALLAPP Let’s you quickly visualize your artwork in different rooms. 2020 was the year of the pandemic and our school auction was on-line.
I was looking for a way to Showcase the artwork.... WALLART. Is a free APP that Let’s you visualize what the art will look like in different rooms! Just drop your artwork into a room, you can resize the art and save the file!
I virtually staged The Liberty Mural so that bidders could visualize what the painting looks like in different environments.


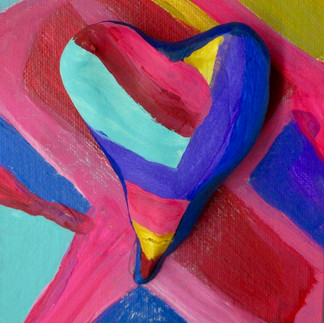
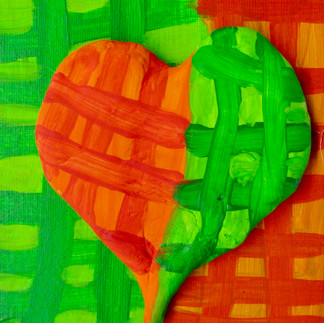
Grade 1 Collaborative sculpted hearts

First grade students worked together to create this sculpted heart collaboration. Each student sculpted one heart from Crayola Model Magic and painted one 4"x6" canvas panel background.
This sculptural heart installation was built inside of a golden frame that measures 30"x24"
Supply List
Canvas Panels, 4"x6" (one per student)
Crayola Model Magic (1oz per student) find it HERE
Acrylic Craft Paints. These acrylic paints are more economical and are not heavy body. You can find a set of acrylic craft paints HERE
Hot Glue
Mod Podge, I used Gloss, find it HERE
Frame that fits all of the Canvas Panels. Before you start this project I recommend finding the frame that will accommodate the amount of canvas panels you need. I was lucky to find this golden frame at Michaels on sale and (30"x24") is the perfect size to fit 15 (4"x6") canvas panels!
*I would not start a collaborative art project without first figuring out how and where everything is going to fit! It's important to start with a vision of how all of the pieces fit together to create the finished product!
This video documents the process of creating Sculpted Hearts...
Students started with 1oz of Model Magic. We shaped a heart together then let it dry. While the hearts were drying each student painted a 4"x6" canvas panel with economical acrylic paint. The following week, students painting their sculpted hearts and could add more painting details to their canvas panels as well.


Grade 1 sculpts hearts using model magic, paint background canvas boards, and paint hearts.

This is how 15, 4"x6" canvas panels fit inside the 30"x24" frame.
Sculpted hearts were hot glued to each canvas panel. Then a layer of Mod Podge was applied over the sculpted hearts and canvas panel for protection and shine! The Mod Podge dried over night.

Each students sculpted one heart and painted one canvas panel.


I found this amazing website ohmyprints.com
Direct link to WALLAPP
WALLAPP Let’s you quickly visualize your artwork in different rooms. This was the year of the pandemic and our school auction was on-line.
I was looking for a way to Showcase the artwork.... WALLART. Is a free APP that Let’s you visualize what the art will look like in different rooms! Just drop your artwork into a room, you can resize the art and save the file!
I virtually staged The Sculpted Hearts Collaboration to see how it might look in some one's space.

Sculpted Hearts in a living room.

Sculpted Hearts in a play room.
Sculpted Hearts, Grade 1 Collaboration.
This Collaborative art project was created for the school auction, Learning Goals: I can... - Work collaboratively with others to create art for my school community - Create a heart out of clay and design a colorful background
Grade 3 Collaborative Delaunay Mural

Third grade students worked together to create this collaborative abstract mural in the style of Robert Delaunay. Each student painted one section (some students painted two sections. I have documented the sections that each student has contributed. The finished mural measures 30"x40".
ABOUT Robert and Sonia Delaunay
Sonia Delaunay and her husband Robert Delaunay worked only with colors and shapes, their paintings were abstract.
Sonia Delaunay (13 November 1885 – 5 December 1979)
Sonia designed unique fabrics inspired from her paintings. She persuaded the fashion-conscious women of Paris to wear dresses cut from them. Her clothes were a huge success! Delaunay felt that she was taking modern art out of the artist's studio and she was one of the first to bring art directly to the people through clothes and furnishings. See fashion designs inspired from her paintings HERE

Robert Delaunay (12 April 1885 – 25 October 1941)
was a French artist who, with his wife Sonia Delaunay and others, co-founded the Orphism Art Movement, noted for its use of strong colors and geometric shapes. His later works were more abstract. https://en.wikipedia.org/wiki/Robert_Delaunay
Supply List
Canvas 36"x48"
Acrylic paint
paint brushes
Soft Gel Gloss by Golden
Delauny Plans found HERE
The Delauny mural plans were found at artprojectsforkids.org
Thank you Kathy for your amazing mural plans ; )
When working on a collaborative art project I recommend buying the frame or canvas first! Once you have found the frame or canvas that will work with the project you will know what size to make everything to fit inside. If you wait to find the perfect frame after you complete the project you will most likely have to custom order the frame or custom build a canvas that fits your project and that will be very expensive!
Once I found the canvas I knew how big I needed to print each section. The mural sections were printed on card stock so that the paper would be strong enough to hold the wetness of the paint. Don't print the mural sections from an ink jet printer the ink is not permanent. I went to a copy store to run off the mural sections.
This video documents the process of creating the Delaunay Mural...
Each student painted one section of The Delaunay
This is what all the sections of the murals looked like before they were decoupaged to the canvas.

I found this amazing website ohmyprints.com
Direct link to WALLAPP
WALLAPP Let’s you quickly visualize your artwork in different rooms. This was the year of the pandemic and our school auction was on-line.
I was looking for a way to Showcase the artwork.... WALLART. Is a free APP that Let’s you visualize what the art will look like in different rooms! Just drop your artwork into a room, you can resize the art and save the file!
I virtually staged The Delaunay Mural to see how it might look in different spaces.
In an office...

In a living room...


Learning Goals: I can... - Work collaboratively with others to create art for my school community - Create art inspired by the style of Robert and Sonia Delaunay
Grade 2 Collaborative Birds in Trees
This fifteen panel dimensional mural of birds in a tree was created by second grade students for the school auction. Each student painted one 8"x8" canvas. The tree unites all of the panels.

Learning Goals:
I can...
- Work collaboratively with others to create art for my school community
Supply List
23 Canvasses 8"x8"
Acrylic paint
paint brushes
stencils of leaves and flowers
wood glue, nails
wood board for base 24"x40"
I have seen different versions of this collaborative bird mural online and I wanted to give it a try. The Birds in the panels were inspired by the children's book, Birds by Kevin Henkes. WOW! What a great book! It is educational, creative, inquisitive, and the bird illustrations are simply beautiful. Students recreated the brightly colored birds in the story.

This class had 15 students so the mural has 15 sections. I sketched out the shape of the tree making sure to leave plenty of spaces for birds and being careful to make sure that the tree united the panels. After students painted the birds, the tree was painted, and finally the background was carefully painted blending complimentary colors around the birds, I helped with the color blending. leaves and flowers were added with stencils.


The canvases were arranged in order so that the tree branches lined up.
A parent volunteer that has amazing carpentry skills helped to assemble all of the sections onto one piece of wood.
This video highlights the dimension in the panels.
Collaborative Birds in Trees by Grade 2


Grade 3 Collaborative Cactus Garden
We looked at photographs of cacti and succulents for inspiration.
Third grade students worked with many hand building techniques...pinching, modeling, coil building, slab building, score and slipping. Texture was added using a variety of ceramic tools with an emphasis on resembling the surface quality of cactus. Students mixed glazes to customize colors.

Learning Goals:
I can...
- Work collaboratively with others to create art for my school community
- Create art in the style of cacti
- learn ceramic hand building techniques
- mix glazes to create unique colors
Supply List
small rocks
terra-cotta saucer
Each Student contributed one cactus to make this cactus garden complete. A variety of hand building techniques were use to create these cactus forms. Most cactus sculptures were started by making a pinch pot and turning it upside down. Surface texture was added using a variety of ceramic tools with an emphasis on resembling the surface quality of cactus.


I recommend Mayco Stroke & Coat glazes. They are called the wonder glazes because they are truly wonderful to use. I love this brand because you can mix the underglazes to create custom colors and there are not too many surprises. What I love about this brand the most is the glaze can be applied to wet clay, greenware, bone dry clay, or bisque. These glazes eliminate the need to do a bisque fire. Students glaze wet clay or bone dry clay, I fire it 06 and it's finished! Yes, sometimes clay that is not bisqued is more fragile and that's why I also recommend a jar of Duncan Patch Attach. It's a specialty product, just like a slip but extra sticky and fixes broken greenware before you fire it.
When the ceramic cacti came out of the kiln they were arranged in a large terra-cotta saucer and small white stones were arranged around them. This collaborative ceramic cactus garden is a great way to permanently enjoy cactus, without having to actually take care of them! Available for bidding at the school auction.

Grade 3 Collaborative Matisse Mural
Third grade students worked together to create this collaborative Ode to Matisse mural. Each student painted two sections of the mural. I have documented the sections that each student has contributed. Our mural, Ode To Matisse, is inspired by Matisse's later collage works which he called, "drawing with scissors." Our mural incorporates Matisse's popular "cut-out" organic shapes and lots of bright colors. The finished mural measures 27"x40". This Collaborative art project was created for the school auction.

Learning Goals:
I can...
- Work collaboratively with others to create art for my school community
- Create art in the style of Matisse
Henri Matisse (31 December 1869 - 3 November 1954) was a French artist, known for his use of color and patterns. He was a painter, printmaker, and sculptor. See his work HERE.
Supply List
Frame and mat board 27"x40"
Acrylic paint
paint brushes
Soft Gel Gloss by Golden
Matisse Mural Plans found HERE
The Matisse mural plans were found at artprojectsforkids.org
Thank you Kathy for your amazing mural plans ; )
When working on a collaborative art project I recommend buying the frame or canvas first! Once you have found the frame or canvas that will work with the project you will know what size to make everything fit. Purchase the frame or canvas first and you can select something in a standard size and most likely you can find a coupon for it too! If you wait to find the perfect frame after you complete the project you will most likely have to custom order the frame or custom build a canvas that fits your project and that will be very expensive!
Once I found the canvas I knew how big I needed to print each section. It was necessary to use Photoshop to resize each section of this mural to make sure it would fit perfectly on the 27"x40" canvas. The mural sections were printed on card stock so that the paper would be strong enough to hold the wetness from the paint. Don't print the mural sections from an ink jet printer, the ink is not permeant. I went to a copy store to run off the sections.


Students followed the colors in the mural plan and painted one section each. Students worked together to paint additional sections. When all the sections were painted they were organized in order.

This video shows students painting sections of the Collaborative Matisse Mural
This video shows the process of decoupaging the mural onto a board.
Grade 4 Collaborative James Rizzi City
Fourth grade students worked together to create this sculptural cityscape in the style of James Rizzi. Each student painted a building with personality. (most students also painted a vehicle.)

Learning Goals:
I can...
- Work collaboratively with others to create art for my school community
- Create art in the style of James Rizzi
- Create art from recycled materials

James Rizzi's "Take the A train to Harlem" painting inspired our 4th grade collaborative project.
James Rizzi was born in 1950. He studied art in Florida (Gainesville), where he started experimenting with printing, painting and sculpting. Rizzi is famous for his sculptural paintings and he often paints his birthplace New York City. His paintings have bright colors and his buildings have human faces! James Rizzi website
This you must see! James Rizzi designed a city block in Germany! This block is called "Happy Rizzi House." See it HERE
Supply List
cardboard
acrylic paint
assortment of permanent markers
scissors
hot glue
Picture frame (with a wooden backing to build off of.)
To start I measured the buildings (per number of students) to make sure they would all fit into the background.


Students designed and painted their buildings in the style of James Rizzi adding an exciting face. There is one layer of paint and when the paint dries students use permanent markers to draw details on top of the paint.
I have documented the sections that each student has contributed. Here are a few student contributions. This Collaborative art project was created for the school auction.


There is a great book about James Rizzi's 3-D Constructions that I highly recommend as a resource. James Rizzi: 3-D Constructions by Gerrit Henry
By layering the cardboard underneath the buildings and cars I create dimension in the composition. Heres a look underneath one of the cardboard cars.
This video shows the dimension in this collaborative sculptural Rizzi inspired city.


Grade 4 Collaborative Cupcake Installation
We looked at photographs of cupcakes for inspiration.
Fourth grade students worked with many hand building techniques...pinching, modeling, coil building, slab building, score & slipping. Texture was added using a variety of ceramic tools with an emphasis on resembling the surface quality of cupcake. Students mixed glazes to customize colors.

This collaborative ceramic cupcake installation will add color to any room and is a great way to permanently enjoy cupcakes, without having to eat them! Available for bidding at the school auction.
Learning Goals:
I can...
- Work collaboratively with others to create art for my school community
- Create art in the style of cacti
- learn ceramic hand building techniques
- mix glazes to create unique colors
Supply List
cup cake tray or display stand
Each Student contributed one cupcake to make this installation complete. A variety of hand building techniques were use to create these cupcake forms. Cupcake sculptures were started by making a pinch pot and pressing the pot inside of a silicon cupcake liner to create the lines that look like cup cake wrappers. The top of the cupcakes were created with one long coil that has the look of an ice cream swirl. I documented each cupcake separately.


I recommend Mayco Stroke & Coat glazes. They are called the wonder glazes because they are truly wonderful to use! I love this brand because you can mix the underglazes to create custom colors and there are not too many surprises. Want I love about this brand the most is the glaze can be applied to wet clay, greenware, bone dry clay, or bisque. These glazes eliminate the need to do a bisque fire. Students glaze wet clay or bone dry clay, I fire it 06 and it's finished! Yes, sometimes clay that is not bisque can be more fragile and that's why I also recommend a jar of Duncan Patch Attach. It's a specialty product, just like a slip but extra sticky and fixes broken greenware before you fire it.

Grade 4 Fluid Painting Collection

Fourth grade students explored painting without a paint brush! Fluid Painting is a type of abstract art that uses acrylic paints mixed with different pouring mediums to create a fluid, flowing consistency. The acrylic paints react with each other when combined to create extraordinary patterns and designs.
Students learned pouring techniques such as puddle pouring, dirty pour, and swiping.
Each student created two fluid paintings one to donate to the auction and one to keep.
Each painting measures 6"x6" each when hung together they measure 18"x30"
Learn all about fluid painting HERE
You will find a list of art supplies necessary for fluid painting, my recipe, and three pouring techniques that students learned; puddle, dirty pour, and swiping.
Happy Pouring!
This video shows the process of fluid painting with Grade 4 students...
I love the look of lots of small pours (6x6 canvas) all together as one piece. Look at all that incredible Unity and Variety working together as one unique harmonious piece.

WALLAPP Let’s you quickly visualize your artwork in different rooms. This was the year of the pandemic and our school auction was on-line.
Direct link to WALLAPP
I was looking for a way to Showcase this fluid painting collection .... WALLART. Is a free APP that Let’s you visualize what the art will look like in different rooms! Just drop your artwork into a room, you can resize the art and save the file!


Learning Goals: I can...
- Work collaboratively with others to create art for my school community
- Learn about fluid painting and create exciting abstract art
Grade 5 Collaborative Chihuly Chandelier
Fifth grade students created a collaborative chandelier in the style of Dale Chihuly for the school auction. This Chandelier is fully functional... it lights up!

We looked at many images of Dale Chihuly's chandeliers. Students voted The Fire & Water Chandelier as their favorite. The Fire & Water Chandelier was our inspiration and we worked in the same color scheme.

Dale Chihuly's Fire & Water Chandelier was our inspiration
We watched a fascinating time lapse video of the assembly of The Fire & Water Chandelier on YouTube
Learning Goals:
I can...
- Work collaboratively with others to create art for my school community
- Create art in the style of Chihuly
- Created recycled art
- Use a warm and cool color scheme
Supply List
Brunsta Pendant Lamp Shade from Ikea
Emma cord set
100+ plastic water bottles, plastic soda bottles (we used an assortment.
acrylic paint (warm colors and cool colors)
scissors
Assorted plastic cable ties (for attaching the bottles to the lamp frame)
lightbulb
I wanted our chandelier to be functional I found a lamp shade design that we could build off of at Ikea.

We started by painting over 100 plastic water bottles with acrylic paint. Students designed each bottle however they wanted as long as they were working with the color scheme of The Fire & Water Chandelier and painting only one color family at a time: Warm Colors: Red, yellow, orange, pink or Cool Colors: Blues and purple.
The bottom of the plastic bottles was cut off first. To hold the bottles while painting students often put their hands inside of the bottle while painting.The outside of the bottles were painted.


After the bottles were painted they were cut into spirals. Spiraled bottles were attached to a metal lamp shade with plastic cable ties.

This collection of photographs documents the process of building our Chihuly Chandelier.


This video shows the chandelier with the light off and on. The video was shot before the entire tail of the chandelier was built.
Looking inside of the chandelier gives a good view of how the bottles were attached with cable ties. Yes it's possible to reach inside and change the light bulb!

Lights off and lights on...our chandelier is functional!


Grade 5 Collaborative Sunflowers
5th grade students worked together to create a collaborative sunflower sculptural painting for the school auction.

Did you know that the last time one of Van Gogh's Sunflower paintings was auctioned (1987) the painting sold for a record price of 39.9 million dollars! Fifth grade students hope to raise a record amount at the school auction this year! This Collaborative Sunflower painting was created for the school Auction, Happy Bidding!
Learning Goals:
I can...
- Work collaboratively with others to create art for my school community
- Create art in the style of Vincent Van Gogh
- Create art with a lot of texture
- Create art from recycled materials
Supply List:
Joint Compound
Plastic utensils
light weight cardboard (cereal boxes)
scissors
acrylic paints
Paint brushes
green paper variety for stems and additional petals
tacky glue or hot glue
Soft Gel Gloss by Golden
Van Gogh was known for his thick application of paint, called impasto. An Italian word for “paste” or “mixture”, impasto is used to describe a painting technique where paint is laid on so thickly that the texture of brush strokes and palette knife are clearly visible. See Vincent Van Gogh's famous Sunflower seriess HERE.
Students used joint compound to build the texture of their Sunflowers. Each student contributed a textured/painted Sunflower. Look at the incredible texture!

Some students also contributed leaves.
I have documented the process and the sections that each student created.


When working on a collaborative art project I recommend buying the frame first! Once you have found the frame that will work with the project you will know what size to make everything to fit inside of the frame. When I saw this frame in the store I knew it would be perfect for this sunflower collaborative art project! Another perfect feature of this frame was it came with a piece of wood behind the glass. I needed to pop the glass out which was harder than it sounds because the glass was actually glued to the frame. Once the glass was out I had a board to build off of and I knew what size to make the vase and what size to make the sunflowers. Once I had the frame the project came together! When you purchase the frame first (you are selecting something in a standard size) usually you can find a coupon for it too. If you wait to find the perfect frame after your collaborative art project is finished you will most likely have to custom order the frame that fits your project and that will be very expensive!
This video shows the process of making this collaborative Sculpted Sunflower
School Collaborative-Interactive Puzzle, 2022

Grace Belongs To You Puzzle by Kindergarten to Grade 5. This puzzle will be featured in the 2022 School Auction. This year our school theme is "Belonging"...All 100 pieces in our school puzzle fit together and belong together!

This is the box design for the puzzle created in Google Layout.!
Each student from Kindergarten to Grade 5 designed one section of puzzle.
Functional Art!
Supply List:
Permanent Markers
DIY Large Blank Jigsaw Floor Puzzle (100 Pieces, 27 x 36 In) HERE
Some students worked in teams to create connecting puzzle pieces!


The finished puzzle has 100 pieces and measures 27"x36".

This Collaborative art project was created for the school auction, Happy Bidding!
Learning Goals: I Can...
- Work collaboratively with others to create art for my school community
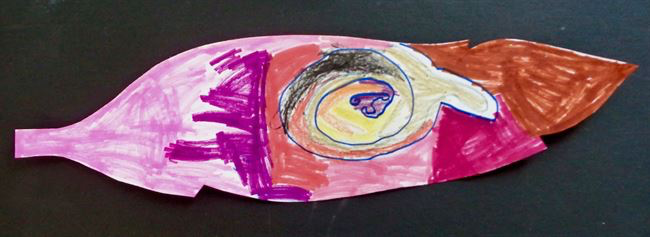
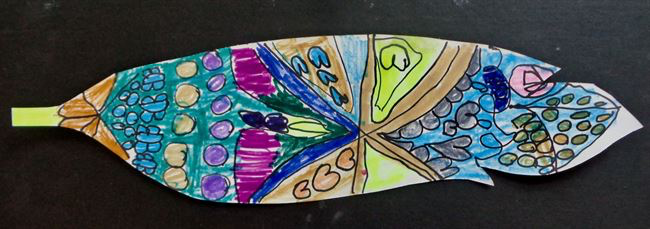
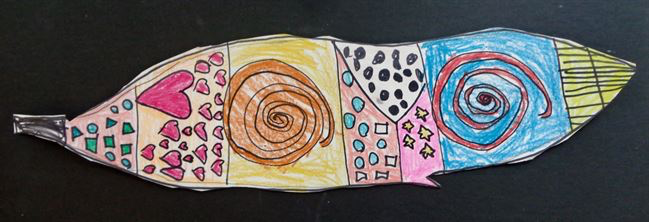
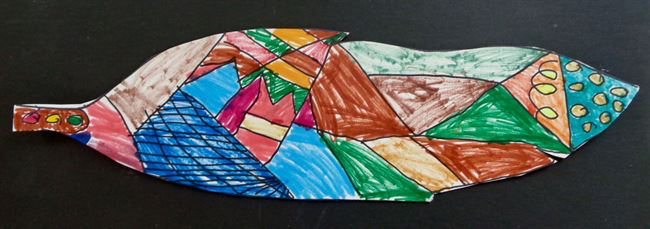
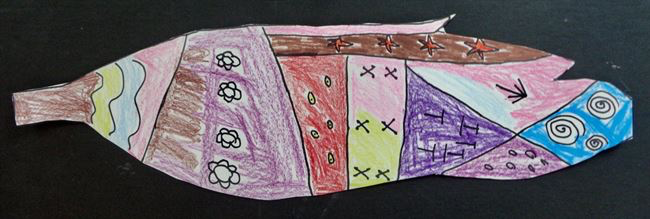
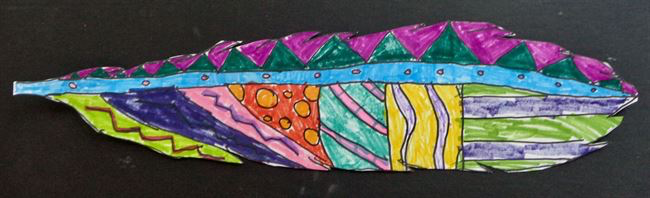
Kelsey Montague-Interactive Collaborative Mural

“What lifts you?”
International street artist, Kelsey Montague, began a “What Lifts You” campaign to provide people with the opportunity to share what inspires them. She chose wings, separated with a space for each individual to stand.
Special thanks to All the student artists who contributed each feather.
I collected 80+ feathers. Here are a few... Each feather is unique.


Kelsey Montague believes that art should not be separated from the human experience, but that the human experience should have a hand in creating the art itself!
This is one of Kelsey's larger than life interactive murals
...and it's being interacted with at this moment!

Street art is becoming very popular in the art world. What I love about street art is that it is accessible to everyone. Kelsey Montague has taken her street art to the next level by making it interactive. She's also inspired people to think about #whatliftsyou.
I love everything about Kelsey's murals: the beauty, the message and the interaction!
Kelsey has painted large scale, interactive street murals in six countries on three continents. Each mural has provided the opportunity for thousands of people to become living works of art. Participants are invited to step in to the artwork, explore what inspires them, and post pictures on social media under the Instagram hashtag #whatliftsyou.
Kelsey’s art has been featured by the New York Times, The Wall Street Journal, Forbes, Mashable, and MTV, as well as seen on Instagram accounts of Taylor Swift and Vanessa Hudgens. Click HERE to see her website.
Learning Goals:
I can...
- Work collaboratively with others to create art for my school community
- Create art in the style of Kelsey Montague
- Create an interactive mural for my school
Supply List:
3"x18" poster paper
feather templates (optional
magic markers
scissors
hot glue (teacher only)
bulletin board paper
Thank you Cassie Stephens for your Kelsey Montague Inspired art lesson.
You can find Cassie's art lesson HERE.
Every student created one feather to add to the school wings. Feather shapes were drawn on 3"x18" paper. Feathers templates were available and they were good to have weather or not students used them because it helped to create all feather about the same size. The feathers were colored with markers. We worked on feather designs most of the school year (when art projects were finished students would continue on their feathers.) In the Spring when all the feathers were designed the mural was built.
Building the wings.
I built the wings on bulletin board paper. Two wing shapes were cut out at the same time so that I could build them as evenly as possible. I attempted to create symmetrical wings!


I recommend Kelsey's book," What Lifts You: Uplifting Designs to Color & Create." Find it HERE All the wing illustrations in this book helped me (a lot) to design our wings!
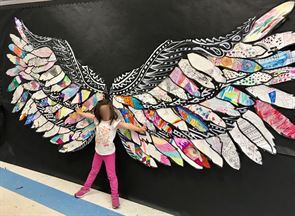


Students loved the experience of interacting with the mural.This interactive/collaborative mural bought our school community together. Every morning during "drop off" students and parents stopped for a moment to become part of the art. Students also enjoyed the challenge of finding the feathers that they created inside of the wings, it was an interactive I spy treasure hunt!
Students were excited to discover that one of Kelsey Montague's murals is located only a few miles from our school! Students were so excited to tell me they found Kelsey's mural...this mural was not the easiest to find. It's in an alley with a parking garage on one side.
In September 2017 Kelsey Montague painted a wing mural in Bethesda, Maryland. Read about the Bethesda mural HERE.

Kelsey Montague's Bethesda Row Mural
Grade 6 Large Scale Murals

Mural Project
Working with two hundred sixth graders, divided into groups of twenty five. Eight murals were completed. Prints of famous paintings were cut into small squares and each student was assigned to paint one or two squares. Students used a grid method to keep their sections of the paintings in proportion. The famous painting remained a mystery until all squares were painted and the pieces were assembled. Each mural is approximately five feet by six feet and is on permanent collection at The Escuela Americana, school library, in Pachuca, Mexico.