Chihuly Macchia "Faux Glass" Sculptures
- Emily Gould
- Feb 17, 2020
- 7 min read
Updated: Jun 23, 2023

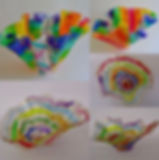
Macchia Sculptures by 5th grade students
"It is one thing to make it as a craft, to make beautiful objects that are functional, but to make it as an art you have to make something that no one has seen before." ---Dale Chihuly
Students took a look at the work of American glass sculptor, Dale Chihuly.
His amazing glass installations can be seen around the world! His works range from small pieces to large scale installations, both outdoor and indoor, often accompanied by the striking effects of dramatic lighting.

Macchia Sculptures by Dale Chihuly
What’s a Maachia?
Here is the story:
Chihuly woke up one morning and said, “I’m going to use all 300 colors of glass that are made, in as many combinations as I can.” He called this new series of artworks Macchia (MAH-key-ah) which is Italian for “spotted”.
For these pieces Chihuly mixed up all the colors in different ways, like a collage, to create all sorts of multicolored, spotted Macchia. With so many colors, some people thought his new creations were ugly at first, but Chihuly loved them and kept on making them. Today they are displayed in museums around the world!

Chihuly Macchia Sculptures
A large part of the appeal of Chihuly's work, aside from the beautiful character of the material and the colors and patterns within it, is the inspiration he takes from natural organic forms.
See Chihuly's website here... http://www.chihuly.com Inspired by Dale Chihuly's glass sculptures students used acrylic gloss enamel paints, clear plastic craft sheets, and an Embossing Heat Tool. Students cut the plastic film into a twelve inch circle and painted it with acrylic gloss enamels. When the paint dried the plastic circle was taped to the lid of a jar with the painted side up. Students used the crafters heat tool to slowly melt the plastic film and create an original Chihuly inspired faux glass form.

This is one of my favorite art lessons to teach! Students enjoy discovering and working with new art materials. The artwork of Dale Chihuly inspires All!. I have taught this lesson to 5th grade and up. Occasionally younger students in a smaller class size.
Supply List (and notes)
---Heat Embossing Tool. This is the heat gun I'm using is... Uchida Embossing Heat Embossing Tool with Stand, (120V, 360W)
*I do NOT recommend using heat guns from the hardware store for younger students. Heat Guns from the hardware store get much hotter than crafters embossing heat tools! The heat tool that I use is a little hotter than a hair dryer and requires patience. Patience is a great skill to learn!
---Plastic Craft Sheets.
*My students are working from 12" circles so I purchased the 12" squares. To make this project more economical use smaller sheets of plastic. Plastic thickness is important we are using 20 mil or .020 OR 0.2 inches
also known as Heavyweight Dura-Lar Clear Film
---Acrylic Enamel Paint. I'm using FolkArt PROMOGLS16 Enamel Glass Painting Set
*A little bit of paint goes a long way. This set should be more than enough for a class of 30 students! This paint is designed to stick to glossy surfaces it is the same paint you use to paint wine glasses. I prefer the acrylic enamels because they don't smell.
*Alternative Materials... Instead of Acrylic Enamel Paint you can use Glass Paint Markers OR Sharpies Permeant Markers. I prefer the look of the paint.
---Paintbrushes
---Scissors
---Masking tape

Making Faux-Glass Chihuly Inspired Macchia Sculptures
The Process...

We started this project by measuring a 12" circle onto the Grafix Plastic Sheets. We used 12" cardboard cake circles to measure perfect 12" circles. Notice we are using black permanent markers, Sharpies to trace our circles. The Grafix Plastic sheets have a clear protective film on each side of the plastic to protect the plastic from getting scuffed and scratched, You must remove the film before you paint the plastic circle. Cut the circle out and then remove the protective film from each side. Yes two sides of protective film must be removed! Just scratch the surface with your finger nail and the film will begin to peel, it's very easy to pull off. When the protective film is removed you can no longer see the black permanent marker marks!

This plastic sheets are not that hard to cut into circles. You can see in the picture above we are using kid scissors. Sometimes I needed to take out my adult scissors and assist but it really depended on the quality of the kid scissors. Most students had success cutting out their 12" circles using child scissors!
Do the circles need to be cut out perfect?
I tell students not to worry if their circles are not perfect circles. I remind them that the form we are shaping them into is organic and each sculpture is so unique. In the end no one will know if your circle did not get cut out perfectly! Perfect circles are not necessary for this sculpture project.
Painting Circles

After the protective film is removed from BOTH sides of the plastic circle it's time to paint!
If you purchased Dura-Clear plastic the protective film is blue. If you purchased Grafix plastic the protective film is clear and more difficult to see if you're not aware it's there.
Students paint one side of their circles. We are using Acrylic Gloss Enamel paint. I like the acrylic enamels because they don't smell. A small amount of paint goes a long way. The paint needs to dry overnight so we set them on the drying rack and we continue next week.
This video shows the process of creating Maccia "Faux Glass" Sculptures...
Shaping The Sculptures
This video shows the process of shaping the sculptures.
It takes about ten minutes to shape one sculpture.
You need to be patient. The plastic heats up slowly. Once the plastic is heated you can change the shape by holding the plastic in a new position using a pencil. The plastic cools quickly, about 30 seconds and then it will hold the new shape.
It's very important to shape your Macchia sculpture PAINT SIDE UP! This allows the paint to heat and stretch with the plastic. If you shape your sculpture paint side down the paint will crack!


You will need a jar with a lid, like an empty spaghetti sauce glass jar. On the lid use one piece of masking tape to hold the plastic circle in place. I tell students to try to center the plastic. Tape the plastic circle PAINT SIDE UP. One piece of tape will hold the plastic circle in place!


It takes about ten minutes to shape one sculpture.
Notice the student is holding a pencil in her other hand because sometimes it is necessary to hold the plastic in place for maybe ten seconds until it cools and the new shape becomes permanent .


If the heat embossing gun is held in one place for too long it will burn a hole through the plastic! It is important to keep the heat embossing tool moving. Do NOT hold the heat embossing tool in one spot for too long. This is an important lesson in patience.
Move the tool up and down one side of the circle at a time. Keep your eyes on the plastic it will start to become flexible and that is when you can use the pencil to hold the plastic in a new shape. Continue moving the heat embossing tool around each side until the desired shape is achieved. Allow the plastic film to cool for a minute and then remove it from the lid. If you want to change the shape you can tape it back onto the lid and continue to apply heat.
In this video four students are shaping their sculptures at the same time.
The sculptures are taped to the tops of glass jars with the PAINT SIDE UP.
It's not always possible to melt the plastic exactly the way you want it to go. The more you practice the more control you will have with the shape of your sculpture. I remind students that these are organic free forms and each one is beautifully-unique!

Macchia Sculptures by Middle School and High School Students

Macchia Sculptures by 5th grade students
Displaying Macchia Sculptures

These are Chihuly's Macchia sculptures on display.

This year I bought several succulent plant stands. They fit the sculptures perfectly and looked amazing in the school display case. If you are looking for a way to display your students Maccia Sculptures...Try these plant stands! You can find bamboo succulent plant stands HERE

Panoramic photo and video of Maccia Sculptures on display...
Maccia Sculptures on display
The most exciting part...
🤩 Dale Chihuly saw our Macchia Sculptures on Instagram! 🤩

Thank you United Art & Education.
The Idea for this Chihuly Macchia Art Lesson came from The Faux Handblown "Glass" Bowl- Project#115
When I first saw this lesson I immediately thought of Dale Chihuly's glass sculptures!... Especially his Macchia Sculptures!. When I can connect an art lesson with an artist or art movement it also becomes a lesson in art history.
United Art & Education has a great YouTube video about how to create Faux Handblown "Glass" Bowl- Project #115. Watch it here... https://www.youtube.com/embed/taG_LPXWZLE?autoplay=1

I do not own enough heat embossing tools for my entire class. For many years I only had two...Now I have four heat embossing tools. Thanks to a generous donation : )
How do I manage a class of students with a limited amount of heat embossing tools?
My demo table is set up as "The Embossing Station. "
I put the names of my students into a container. I pull out four names at a time. Those four students will go over to The Embossing Station and shape their sculptures. It takes students about ten minutes to shape one sculpture.
It's necessary to have another art lesson going on at the same time. Usually I teach figure drawing. I think the Chihuly Macchia Sculptures are the perfect ten minute break from a figure drawing lesson! The drawing assignment is on the board and I walk around the classroom assisting with drawings and then back to The Embossing Station to inspect progress.
Drawing The Articulated Figure


While students are waiting to have a turn at The Embossing Station. The Assignment is to draw three or more figures that change sizes within a landscape. We are now studying the figure and proportions. Our next project is sculpting the figure out of clay.
Perhaps that will be another blog post.


I like to take several photographs of the macchia sculptures because there are so many interesting angles. I love how the light reflects on the surface it looks very similar to glass.


If your looking for a memorable sculptural art lesson with stunning results...this is it!
This art lesson introduces students to an iconic contemporary artist, Dale Chihuly.
Don't forget to tag me on Instagram....I look forward to seeing your students sculptures!